LCD can be a very useful part in any microcontroller based project. It helps to monitor variables and program status with simple texts or numbers.
For this application I used a JHD 162 A alphanumeric LCD, like the picture above.
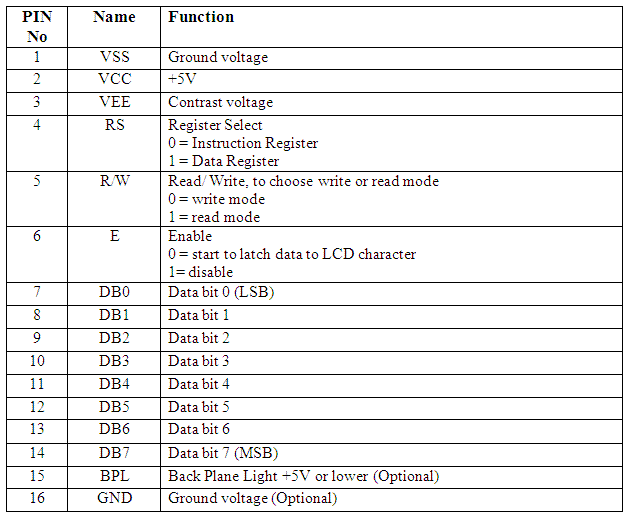
VEE is used for contrast, so attache it to a potentiometer and choose your best contrast. Or simply plug it to 5V if you need maximum contrast.
I managed to find a library for STM32VL, so I needed to bring some changes to it before it works. This library works both for JHD 162A and the hd44780.
lcd_hd44780.h
//******************************************************************************
//    THE SOFTWARE INCLUDED IN THIS FILE IS FOR GUIDANCE ONLY.
//    AUTHOR SHALL NOT BE HELD LIABLE FOR ANY DIRECT, INDIRECT
//    OR CONSEQUENTIAL DAMAGES WITH RESPECT TO ANY CLAIMS ARISING
//    FROM USE OF THIS SOFTWARE.
//******************************************************************************

//##############################################################################
// lcd_hd44780.h
//##############################################################################

//****************************************************************************//
#include "main.h"


#define LCD_GPIO GPIOD
#define LCD_CLK_LINE RCC_AHB1Periph_GPIOD

#define LCD_D4 GPIO_Pin_1
#define LCD_D5 GPIO_Pin_3
#define LCD_D6 GPIO_Pin_5
#define LCD_D7 GPIO_Pin_7

#define LCD_RS GPIO_Pin_0
#define LCD_RW GPIO_Pin_2
#define LCD_EN GPIO_Pin_4
//******************************************************************************//


#define HD44780_CLEAR                                          0x01

#define HD44780_HOME                                           0x02

#define HD44780_ENTRY_MODE                                 0x04
        #define HD44780_EM_SHIFT_CURSOR          0
        #define HD44780_EM_SHIFT_DISPLAY         1
        #define HD44780_EM_DECREMENT               0
        #define HD44780_EM_INCREMENT               2

#define HD44780_DISPLAY_ONOFF                      0x08
        #define HD44780_DISPLAY_OFF                  0
        #define HD44780_DISPLAY_ON                         4
        #define HD44780_CURSOR_OFF                         0
        #define HD44780_CURSOR_ON                            2
        #define HD44780_CURSOR_NOBLINK     0
        #define HD44780_CURSOR_BLINK               1

#define HD44780_DISPLAY_CURSOR_SHIFT 0x10
        #define HD44780_SHIFT_CURSOR               0
        #define HD44780_SHIFT_DISPLAY              8
        #define HD44780_SHIFT_LEFT                         0
        #define HD44780_SHIFT_RIGHT                  4

#define HD44780_FUNCTION_SET                       0x20
        #define HD44780_FONT5x7                              0
        #define HD44780_FONT5x10                             4
        #define HD44780_ONE_LINE                             0
        #define HD44780_TWO_LINE                             8
        #define HD44780_4_BIT                                  0
        #define HD44780_8_BIT                                  16

#define HD44780_CGRAM_SET                                    0x40

#define HD44780_DDRAM_SET                                    0x80

//##############################################################
void lcd_init(void);
void lcd_cls(void);
void lcd_str(unsigned char * text);
void lcd_strxy(unsigned char * text, unsigned char x, unsigned char y);
void lcd_locate(unsigned char x, unsigned char y);
void lcd_int(int n);
void lcd_intxy(int n, unsigned char x, unsigned char y);

//###############################################################

void lcd_writedata(unsigned char dataToWrite);
void lcd_writecommand(unsigned char commandToWrite);
void lcd_writebinary(unsigned int var, unsigned char bitCount);
void lcd_addchar (unsigned char chrNum, unsigned char n, const unsigned char *p);
lcd_hd44780.c
#include "lcd_hd44780.h"
#include "stm32f4xx_gpio.h"
#include
#include
#include
#include "stm32f4_discovery.h"

GPIO_InitTypeDef GPIO_InitStructure;

//-----------------------------------------------------------------------------
void lcd_writenibble(unsigned char nibbleToWrite)
{
  GPIO_WriteBit(LCD_GPIO, LCD_EN, Bit_SET);
  GPIO_WriteBit(LCD_GPIO, LCD_D4,(BitAction) (nibbleToWrite & 0x01));
  GPIO_WriteBit(LCD_GPIO, LCD_D5,(BitAction)(nibbleToWrite & 0x02));
  GPIO_WriteBit(LCD_GPIO, LCD_D6,(BitAction)(nibbleToWrite & 0x04));
  GPIO_WriteBit(LCD_GPIO, LCD_D7,(BitAction)(nibbleToWrite & 0x08));
  GPIO_WriteBit(LCD_GPIO, LCD_EN, Bit_RESET);
}


//-----------------------------------------------------------------------------
unsigned char LCD_ReadNibble(void)
{
  unsigned char tmp = 0;
  GPIO_WriteBit(LCD_GPIO, LCD_EN, Bit_SET);
  tmp |= (GPIO_ReadInputDataBit(LCD_GPIO, LCD_D4) << 0);
  tmp |= (GPIO_ReadInputDataBit(LCD_GPIO, LCD_D5) << 1);
  tmp |= (GPIO_ReadInputDataBit(LCD_GPIO, LCD_D6) << 2);
  tmp |= (GPIO_ReadInputDataBit(LCD_GPIO, LCD_D7) << 3);
  GPIO_WriteBit(LCD_GPIO, LCD_EN, Bit_RESET);
  return tmp;
}


//-----------------------------------------------------------------------------
unsigned char LCD_ReadStatus(void)
{
  unsigned char status = 0;

    GPIO_InitStructure.GPIO_Pin   =  LCD_D4 | LCD_D5 | LCD_D6 | LCD_D7;
    GPIO_InitStructure.GPIO_Mode  =  GPIO_Mode_IN;
    GPIO_Init(LCD_GPIO, &GPIO_InitStructure);

    GPIO_WriteBit(LCD_GPIO, LCD_RW, Bit_SET);
    GPIO_WriteBit(LCD_GPIO, LCD_RS, Bit_RESET);

    status |= (LCD_ReadNibble() << 4);
    status |= LCD_ReadNibble();

    GPIO_InitStructure.GPIO_Pin   =  LCD_D4 | LCD_D5 | LCD_D6 | LCD_D7;
    GPIO_InitStructure.GPIO_Mode = GPIO_Mode_OUT;
    GPIO_Init(LCD_GPIO, &GPIO_InitStructure);

  return status;
}


//-----------------------------------------------------------------------------
void lcd_writedata(unsigned char dataToWrite)
{
  GPIO_WriteBit(LCD_GPIO, LCD_RW, Bit_RESET);
  GPIO_WriteBit(LCD_GPIO, LCD_RS, Bit_SET);

  lcd_writenibble(dataToWrite >> 4);
  lcd_writenibble(dataToWrite & 0x0F);

  while(LCD_ReadStatus() & 0x80);
}


//-----------------------------------------------------------------------------
void lcd_writecommand(unsigned char commandToWrite)
{
  GPIO_WriteBit(LCD_GPIO, LCD_RW | LCD_RS, Bit_RESET);
  lcd_writenibble(commandToWrite >> 4);
  lcd_writenibble(commandToWrite & 0x0F);

  while(LCD_ReadStatus() & 0x80);
}


//-----------------------------------------------------------------------------
void lcd_str(unsigned char * text)
{
  while(*text)
    lcd_writedata(*text++);
}


//-----------------------------------------------------------------------------
void lcd_locate(unsigned char x, unsigned char y)
{
  lcd_writecommand(HD44780_DDRAM_SET | (x + (0x40 * y)));
}


//-----------------------------------------------------------------------------
void lcd_strxy(unsigned char * text, unsigned char x, unsigned char y)
{
  lcd_locate(x,y);
  while(*text)
    lcd_writedata(*text++);
}


//-----------------------------------------------------------------------------
void lcd_writebinary(unsigned int var, unsigned char bitCount)
{
  signed char i;

  for(i = (bitCount - 1); i >= 0; i--)
     {
     lcd_writedata((var & (1 << i))?'1':'0');
     }
}


//-----------------------------------------------------------------------------
void LCD_ShiftLeft(void)
{
  lcd_writecommand(HD44780_DISPLAY_CURSOR_SHIFT | HD44780_SHIFT_LEFT | HD44780_SHIFT_DISPLAY);
}


//-----------------------------------------------------------------------------
void LCD_ShiftRight(void)
{
  lcd_writecommand(HD44780_DISPLAY_CURSOR_SHIFT | HD44780_SHIFT_RIGHT | HD44780_SHIFT_DISPLAY);
}


//-----------------------------------------------------------------------------
void lcd_init(void)
{
  volatile unsigned char i = 0;
  volatile unsigned int delayCnt = 0;
  RCC_AHB1PeriphClockCmd(LCD_CLK_LINE, ENABLE);
  GPIO_InitStructure.GPIO_Pin = LCD_D4|LCD_D5|LCD_D6|LCD_D7|LCD_RS|LCD_RW|LCD_EN;
  GPIO_InitStructure.GPIO_Speed = GPIO_Speed_50MHz;
  GPIO_InitStructure.GPIO_Mode = GPIO_Mode_OUT;

  GPIO_Init(LCD_GPIO, &GPIO_InitStructure);

  GPIO_ResetBits(LCD_GPIO, LCD_RS | LCD_EN | LCD_RW);

  for(delayCnt = 0; delayCnt < 300000; delayCnt++);

  for(i = 0; i < 3; i++) {
    lcd_writenibble(0x03);
    for(delayCnt = 0; delayCnt < 30000; delayCnt++);
  }

  lcd_writenibble(0x02);

  for(delayCnt = 0; delayCnt < 6000; delayCnt++);

  lcd_writecommand(HD44780_FUNCTION_SET |
                   HD44780_FONT5x7 |
                   HD44780_TWO_LINE |
                   HD44780_4_BIT);

  lcd_writecommand(HD44780_DISPLAY_ONOFF |
                   HD44780_DISPLAY_OFF);

  lcd_writecommand(HD44780_CLEAR);

  lcd_writecommand(HD44780_ENTRY_MODE |
                   HD44780_EM_SHIFT_CURSOR |
                   HD44780_EM_INCREMENT);

  lcd_writecommand(HD44780_DISPLAY_ONOFF |
                   HD44780_DISPLAY_ON |
                   HD44780_CURSOR_OFF |
                   HD44780_CURSOR_NOBLINK);

}


//-----------------------------------------------------------------------------
void lcd_addchar (unsigned char chrNum, unsigned char n, const unsigned char *p)
{
        lcd_writecommand(HD44780_CGRAM_SET | chrNum * 8);
        n *= 8;
        do
                lcd_writedata(*p++);
        while (--n);
}


//-----------------------------------------------------------------------------
void lcd_cls(void){
        lcd_writecommand(HD44780_CLEAR);
}


unsigned char* intToStr(int n){
     int i = 0;
     int j = 0;
   char *tmp = (char*)malloc(sizeof(char));
     unsigned char *ret = (unsigned char*)malloc(12);
   if(n<0 data-blogger-escaped-i="" data-blogger-escaped-j="" data-blogger-escaped-n="" data-blogger-escaped-ret="-" data-blogger-escaped-while="">9){
 *tmp = n%10+48;
 n-=n%10;
 n/=10;
 tmp++;
 i++;
}
*tmp = n+48;
i++;
while(i--){
 ret[j++] = *tmp--;
}
return ret;
}
void lcd_int(int a){
 unsigned short ch,
                    first; //you need this to display 0 if there was any char

    //Get first char
    ch = a/10000;
    if(ch){
     lcd_writedata(48+ch);
     first = 1;
    }

    //Get second char
    ch = (a/1000)%10;
    if(ch || first){
     lcd_writedata(48+ch);
     first = 1;
    }

    //Get third char
    ch = (a/100)%10;
    if(ch || first){
     lcd_writedata(48+ch);
     first = 1;
    }

    //Get fourth char
    ch = (a/10)%10;
    if(ch || first){
     lcd_writedata(48+ch);
     //first = 1;                   //q
    }

    //Get fifth char
    ch = a%10;
    //if(ch || first)   //you dont need to check las one if ch is 0 then just display it, unless you dont want to then uncomment this line ("//q" line too)
     lcd_writedata(48+ch);
       // lcd_str(intToStr(n));
}

void lcd_intxy(int n, unsigned char x, unsigned char y){
        lcd_locate(x,y);
        lcd_int(n);
}
main.c
lcd_init();

        while (1)
          {

                  lcd_locate(1,0);
                  lcd_str("Mazen");
                  lcd_locate(7,0);
                  lcd_str("A.");
                  lcd_locate(0,1);
                  lcd_str("-3125");

          }
Update: