on Sunday, August 22, 2010


Hello everyone and welcome to a new flash tutorial!
This Time I will show you insh'Allah how to create a navigation bar for your sites.
Open a new action Script File and set the Dimensions as below from the properties panel.


Now draw you rectangle in the top of the page, and convert it to a movie clip (F8 -> movie clip),
The rectangle may not be in a correct position, so to adjust it properly select it and go to the properties panel.
x:300/y:0/W:600/H:40
Add an instance name for your rectangle (navbarobjct for example).
Rq: the instance name is very important to manipulate a movie clip with action script.
Rename the First layer as navbar, then create a new layer and name it as "button".
In this button layer I'm going to create all the links I need for my site.


  Select the rectangle tool then choose a color different from the navigation bar's color.


Draw your button shape.
Flash doesn't know that we are going to use this rectangle as a button, So we have to tell him so.


Press F8 then choose the button type, you can also give it a logic name.
Now select the button object from your library and create 2 instances adjacent to each other.
Use your arrow keys to space between the buttons.
You will have something like the picture above.
As you know, a button has three 4 states: the up state, the down state, the hit state and the over state.
To add some interactivity to our buttons we have to change these states.
Double click a button from your page.


A new page opens that describes our button.
Create a key Frame in the over state rectangle (left click -> insert Key Frame).
Left click  on our button then go to the properties panel and change the "Fill color".

Do the same to the two other states.
Rq1: You can enlarge your button in the hit state (go to the free transform tool and change your button's size).
Test your movie (ctrl+ enter).
Rq2:  You can notice that all the buttons are changed in the same way that's one of the great features of oop (object oriented programming). All the buttons are instances of the same object and we can add to each one a unique instance name so we can manipulate it separately.
Now let us add some text to our buttons! But first we have to create a new layer and called it text.
Select your text tool and type the button indicators in the right place.


After doing that select all you texts, go to the properties panel and change TLF text to classic text.

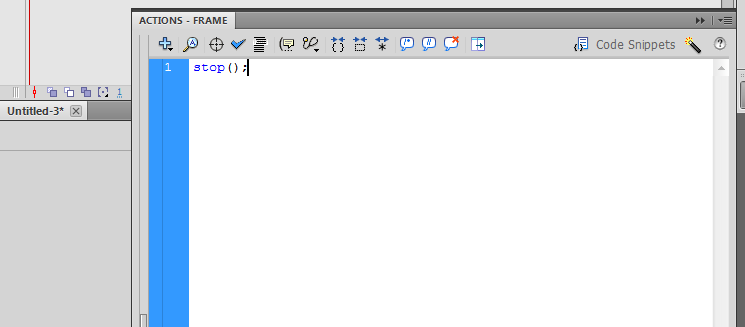
Select your first frame and press F9.
write the stop command. "stop();"


Now I'm going to create a page for the 'contact me' button and another for the portfolio button.
Make a new layer you can call it "content" for example.
 in the fifth frame insert a key frame and set your "contact me " content. It can be a web page a photo or text.
In my case I made a simple text animation (you can learn how to do so by going to this tutorial click here).
 In your last frame type the stop command, then insert a blank key frame next to it.
Do the same thing to the portfolio content.
Now let us go back to our buttons in the first frame to link each button to its page.
Give each one of the button a unique instance name in the properties panel.
Next select a button then (window -> code snippets) .
Select the Timeline Navigation folder and choose click to go to frame and play.
The code will generate automatically like magic in your code editor, all what you have to do is to change the number of the frame in (gotoAndPlay(5)) for example in my case the content of the "contact me" page starts at the 10th frame so I have to change the code to "gotoAndPlay(10)".

Do the same procedure to your other buttons, nothing is difficult!

Now say that you want to add a "Follow me on twitter" button or you want to link a button to a web page.
All what you have to do is to select your button then (window -> code snippets)
select "Click to go to web page" from the Action folder.
change the URL as you like.
Rq: the "_blank" attribute open the web page in a new window.
you can download all the work from here:
http://www.megaupload.com/?d=WM8LY0EJ
Thanks for your attention.
Mazen :)
on Friday, August 20, 2010
Hello everyone!
In this tutorial I'm going to show how to make your text animated in a nice way using "Flash cs5, cs4 or mx2004".
First, open adobe flash then choose from the "Create New menu" "actionScript 3.0" if you are working with flash mx 2004 choose flash document it's exactly the same thing.

Click on the text tool or simply press "t".
Now click in the middle of the page and type your text.
We need to separate all the letters to give each letter a unique effect.  Press (ctrl+b)

In fact to make an effect on our letters we have to convert all of them to movie clips.
Select each one of the letters, click F8 and change the type to "Movie Clip"
You will notice that all of the letters are added to the library with the movie clip icon.
In the next step, we have to put each letter in a separate layer.
So select all the letters then right click and choose "Distribute to layers".

very cute isn't it! each letter now in a different layer. we wont need the first layer so we can simply delete it.
 
Now we are going to make our text animation. Let's go select all the layers in the 40th  frame.

Left click in the last layer's frame, then click on the first layer's frame by holding the shift key.
press F6 to make the selected frames as keyFrames.
Go back to your first frame, press "q" for the free transform tool.
Now select all of the text, by holding (alt + shift) and make it bigger. the alt+shift combination keep the text in his original position while enlarging it.

Minimize the size of your frame so you can make your text even more bigger.
In this step, we are going to add some effect to the letters to make them more dynamic.

Select all of the text and go to the properties panel, scroll down and choose "FILTERS" 
Click the little icon ( it looks like the new layer button) and choose "Blur" from the menu.

let's Give it some Blur! Set the the Blur X and the Blur Y to 80 or 100.leave the quality as low we don't need something very fancy.
Now go to the color effect, set the style as Alpha, and decrease the alpha percentage to 20%
Select a column (or many) of frames just like before. Make sure you don't select the column that contains the keyFrames-> right click and choose Creat Classic Tween. if you are working with mx2004 choose "Create Motion tween".
So let's test our animation. Press ctrl+enter.
As you have notice the animation doesn't stop at the end, So we going to add some action-script code.
Select one of your last frames (the keyFrames) then window->Action or simply press F9.

type the "stop ( );" command.
If you want to explore more action-Script commands, choose "code snippets" from the window menu.
test your movie (ctrl+enter).
Now I'm going to add other modifications to our text animation.
Delete the stop command from your last frame. (click F9 and delete "stop();)

Click in layer label then drag it a little bit the time line to the right. Do the same with the other layers and try to space between them.

While holding your shift key select a column of frames in the end of all the timelines and create a keyFrame where we will code our new stop command.

There we are a new column of keyFrames is created and the code is there just like before.
All what we need to do now is to test our movie (ctrl + enter).
You can add a lot of different effect like rotation or position effects, all what you have to do is to modify your letters as you want in the first frame and flash will take it to its original form.
You can also check out the motion preset panel (window-> motion preset).
I uploaded all the work in megaupload
I saved all the work here
http://www.megaupload.com/?d=DY4S862D
this is an example of the animation, if it doesn't workn right click and choose (play or lire).

Thank you for your attention.
See you in my next tutorial.
Mazen :)
Sans que la commercialisation soit prévue, Microsoft vient de montrer un clavier muni d'un large écran tactile
et de petits afficheurs intégrés aux touches. Un concept connu qui n'a pas encore été largement exploré. L'objet a été livré à des étudiants qui devront imaginer comment s'en servir...
d'après Jean-Luc Goudet,