on Wednesday, March 28, 2012
Hi,
I was working the last days on a project of gesture recognition using labview.
Labview is a great program, a simple programmer can easily learn the graphical language it use, because everything in labview is referred as block and the relations between blocks are maintained with wires.
In my projects I used the vision toolkit which is one of the most great toolKit in labview. Now I can control numerique or analogic data only through my hand.

This is an update:
I continued the project with two of my freinds helmi and slim, we can now control actuator with gestur recognition we succeded at controling the speed of a dc motor by just moving our fingurs :))


It was a great experience :)


on Monday, February 27, 2012

PIC has a lot of interesting features and one of them is the amazing portb that can create hardware interruption in each variation.

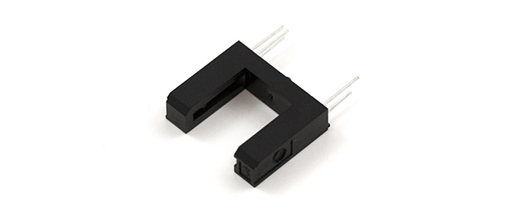
the code above I used to read data from an optical fork.

The code is very simple:

every time there is a state change in one of the portb pin we enter the interrupt routine and we can do whatever we want to do there.

I used the timer 0 interruption just in case you want to do know the number of hardware interruption each period of time.

I used PIC18F4550 and 40Mhz oscillator.

int read=0;
int left=0;
int right=0;
int l =0;
int riL =0;
char txt[7];
void interrupt(){
if(TMR2IF_bit){
portd.RD4=~portd.RD4;
left=l;
l=0;
TMR2IF_bit=0;//never forget to put 0 int the flag after interruption
}
if(INTCON.RBIF==1){
portd.RD2=~portd.RD2;
l++;
read=portb;
INTCON.RBIF=0;
}
}
void init(){
portd=0X00;
trisd=0X00;
portb=0X00;
trisb=0XFF;
//initialisation de ports
intcon=0XC8;
//initialisation des interruption global(GIE,PIE,RBE)
t2con=0X07;
TMR2IE_bit=1;
//timer 2
uart1_init(9600);
}
void main() {
init();
while(1){
inttostr(left,txt);
uart1_write_text(txt);
uart1_write(10);
uart1_write(13);//pour la visualisation

};


}

on Tuesday, February 14, 2012


Hello, 
I've already tested openCV and found a little difficulties to integrate it in a windows form application, although openCV is a great library it's still lack of this characteristic, well I found another magnificent library not so powerful as openCV but can be easily integrated in a c#.net application, it's Aforge.net

It's much easier to learn this framework if you already have knowledge of image processing.
..So I create this application that reads the images from a cheap web cam and look for a specific color in the image get some values from it(x,y,widht) to control a servo via an arduino mega ADK.

To find the object I used blob detection after filter the image with HSLfilter and the convert it to gray scale so I can use the blob detection algorithm  which works only with Binary or gray images.

after that I send the X values of the object through serial to an arduino, where I map it to control a servo angle.

c# code:
using System;
using System.Collections.Generic;
using System.ComponentModel;
using System.Data;
using System.Drawing;
using System.Linq;
using System.Text;
using System.Windows.Forms;
using AForge;
using AForge.Video;
using AForge.Video.DirectShow;
using AForge.Imaging.Filters;
using AForge.Imaging;

namespace hslfilterblob
{
    public partial class Form1 : Form
    {
        private FilterInfoCollection videoCaptureDevices;
        private VideoCaptureDevice finalVideo;
        private int minHue = 0, maxHue = 355;
        private float minLum = 0, maxLum = 1, minSat = 0, maxSat = 1;
        private Byte[] buffer = new Byte[1];
        private bool serialok = false;
        private float map = 0f;

        public Form1()
        {
            InitializeComponent();
            videoCaptureDevices = new FilterInfoCollection(FilterCategory.VideoInputDevice);
            finalVideo = new VideoCaptureDevice(videoCaptureDevices[1].MonikerString);
            finalVideo.NewFrame += new NewFrameEventHandler(Finalvideo_newframe);
            finalVideo.Start();
        }

        void Finalvideo_newframe(object sender, NewFrameEventArgs eventArgs)
        {
            Bitmap video = (Bitmap)eventArgs.Frame.Clone();
            Bitmap video2 = (Bitmap)eventArgs.Frame.Clone();
            //Create color filter
            HSLFiltering HslFilter = new HSLFiltering();
            //configre the filter
            HslFilter.Hue = new AForge.IntRange(minHue, maxHue);
            HslFilter.Saturation = new AForge.Range(minSat, maxSat);
            HslFilter.Luminance = new AForge.Range(minLum, maxLum);
            //apply color filter to the image
            HslFilter.ApplyInPlace(video2);
            //create gray filter
            Grayscale grayFilter = new GrayscaleBT709();
            Bitmap grayImage = grayFilter.Apply(video2);
            //display Image
            BlobCounter blobcounter = new BlobCounter();
            blobcounter.MinHeight = 100;
            blobcounter.MinWidth = 100;
            blobcounter.ObjectsOrder = ObjectsOrder.Size;
            //locate blobs
            blobcounter.ProcessImage(grayImage);
            Rectangle[] rects = blobcounter.GetObjectsRectangles();
            //draw rectangle around the biggest blob
            if (rects.Length > 0)
            {
                Rectangle objectRect1 = rects[0];
              
                Graphics g = Graphics.FromImage(video);

                    using (Pen pen = new Pen(Color.Red, 3))
                    {
                        g.DrawRectangle(pen, objectRect1);
                        PointF drawPoin = new PointF(objectRect1.X,objectRect1.Y);
                        int objectX = objectRect1.X + objectRect1.Width / 2 - video.Width / 2;
                        int objectY = video.Height / 2 - (objectRect1.Y + objectRect1.Height / 2);
                        String Blobinformation = "X= "+objectX.ToString()+"\nY= "+objectY.ToString()+"\nSize="+objectRect1.Size.ToString();
                        g.DrawString(Blobinformation, new Font("Arial", 16), new SolidBrush(Color.Blue), drawPoin);
                       
                        if (serialok == true)
                        {
                            int second =0;
                            int offset=300;
                            second = offset - Math.Abs(objectX);
                            map =(float) 0.85 * second;
                            buffer[0] = (byte)Math.Abs((int)map);
                            serialPort1.Write(buffer, 0, 1);
                        }
                    }
                    g.Dispose();
               
            }          
            pictureBox1.Image = video;
            pictureBox2.Image = grayImage;
        }

        private void trackBarMaxHue_Scroll(object sender, EventArgs e)
        {
            maxHue = trackBarMaxHue.Value;
        }

        private void trackBarMinHue_Scroll(object sender, EventArgs e)
        {
            minHue = trackBarMinHue.Value;
        }

        private void trackBarMaxSat_Scroll(object sender, EventArgs e)
        {
            maxSat = trackBarMaxSat.Value / 100F;
        }

        private void trackBarSatMin_Scroll(object sender, EventArgs e)
        {
            minSat = trackBarSatMin.Value / 100F;
        }

        private void trackBarLumMax_Scroll(object sender, EventArgs e)
        {
            maxLum = trackBarLumMax.Value / 100F;
        }

        private void trackBarLumMin_Scroll(object sender, EventArgs e)
        {
            minLum = trackBarSatMin.Value / 100F;
        }

        private void button1_Click(object sender, EventArgs e)
        {
            ColorDialog colorDlg = new ColorDialog();
            colorDlg.AnyColor = true;
            colorDlg.SolidColorOnly = false;
            colorDlg.Color = Color.Red;

            if (colorDlg.ShowDialog() == DialogResult.OK)
            {
                textBox1.Text = colorDlg.Color.GetHue().ToString();
                textBox2.Text = colorDlg.Color.GetSaturation().ToString();
                textBox3.Text = colorDlg.Color.GetBrightness().ToString();
            }
        }

        private void btnCommunication_Click(object sender, EventArgs e)
        {
            try
            {
                serialPort1.Open();
                btnCommunication.BackColor = Color.Green;
                serialok = true;
            }
            catch (Exception t)
            {
                MessageBox.Show(t.ToString());
            }
        }
    }
}

arduino code:

#include <Servo.h>

Servo servo1;
int inbyte=0;
int i;
void setup(){
  servo1.attach(2);
  Serial.begin(9600);
  Serial.println("Start!");
 
  for(i=0;i<180;i++){
    servo1.write(i);
    delay(15);
  }
  servo1.write(90);
}

void loop(){
  if(Serial.available()>0){
    inbyte=Serial.read();
       
  }
     servo1.write(map(inbyte,0,255,0,180));
     delay(15);
}


on Monday, January 30, 2012

Well this is all started when I wanted to send data from a joystick to my laptop to control a robot. What seemed to be obvious for me is that I have to use one of the gaming library to interface my joystick.
after a lot of researches I found 2 decent library the XNA framework and the SlimDx library.
I didn't know why but I didn't like these frameworks.
So I thought .. the joystick is an HID device hence I can interface it just like any other HID device
I started with searching HID library fot c#. I found libusbdotnet seemed intresting but lack of documentation. then I found the USBHIDLIBRARY and I work on it.
This library is just amazing not so complex, simple documentation and does the job properly.
Here is my C# code for interfacing the joystick:

using System;
using System.Collections.Generic;
using System.ComponentModel;
using System.Data;
using System.Drawing;
using System.Linq;
using System.Text;
using System.Windows.Forms;
using USBHIDDRIVER.USB;
using USBHIDDRIVER.TESTS;
using USBHIDDRIVER.List;
using USBHIDDRIVER;
using System.Threading;

namespace USBWork
{
    public partial class Form1 : Form
    {
        USBHIDDRIVER.USBInterface usb = new USBInterface("vid_0079", "pid_0006");
        byte[] currentread=new byte[1024];

        public Form1()
        {
            InitializeComponent();
        }

        private void button1_Click(object sender, EventArgs e)
        {
            USBHIDDRIVER.USBInterface usb = new USBInterface("vid_0079", "pid_0006");
            if (usb.Connect()) lblcnx.BackColor = Color.Green;
        }

        private void usbEventHandler(object sender, EventArgs args)
        {
            lblreading.BackColor = Color.Green;
            ListWithEvent list = (ListWithEvent)sender;
            byte[] byte_array = (byte[])list[list.Count-1];
            //txtusb.Text = "start!\n";
            for (int i = 0; i < byte_array.Length; i++)
            {
                currentread[i] = byte_array[i];
            }
          
          
         }
       
            private void btnread_Click(object sender, EventArgs e)
            {
                usb.enableUsbBufferEvent(new EventHandler(usbEventHandler));
                usb.startRead();
                timer1.Enabled = true;
            }

            private void Form1_FormClosing(object sender, FormClosingEventArgs e)
            {
                usb.stopRead();
            }

            private void timer1_Tick(object sender, EventArgs e)
            {
                txtusb.Text+= currentread[6].ToString();
                if (currentread[6] == 15) chknone.Checked = true; else chknone.Checked = false;
                if (currentread[6] == 143) chkcercle.Checked = true; else chkcercle.Checked = false;
                if (currentread[6] == 31) chktriangle.Checked = true; else chktriangle.Checked = false;
                if (currentread[6] == 47) chkcarreau.Checked = true; else chkcarreau.Checked = false;
                if (currentread[6] == 79) chkX.Checked = true; else chkX.Checked = false;
            }          
                  
        }      

 }


on Wednesday, January 25, 2012
Hello,
today I'm going to show you how to communicate through uart with the RS232 protocol.
how to send and extract data.
let's start with the sending.
with Mikroc you can send to types of data (character and text).
A character can have a value from 0 to 255 but a text is a string of characters.
To do so we need to call the "UART library" from Mikroc

This program sends a character (or a number less then 256) if a request was demanded;

unsigned char read=0
Void main(){
     uart1_init(9600);
while(1){
   if (uart1_data_ready()==1){
       read=uart1_read();
      uart1_write(read);
 }
}
}

this program read a string of characters then resend this string
char txt[120];
void main(){
   uart1_init(9600);
while(1){
    uart1_read_text(txt,"#" ,255);
uart1_write(10);
uart1_write(13);
uart1_write_text(txt);
}
}

What about the electronics:

The UART protocol is amazing but we can't communicate with a PC using it so we have to convert this protocol to an other one that is adopted by PC, the great one is the famous RS232 protocol.
RS232 is very close to the UART protocol the only difference is the logic level:
RS232: 1-->+12V 0-->-12V
UART: 1-->5V 0-->0V
So all we have to do is to find a way to convert the logic level from PC to PIC and From PIC to PC
The best solution is the one provided by Maxim the MAX232 circuit:
This little circuit does the job quite well.
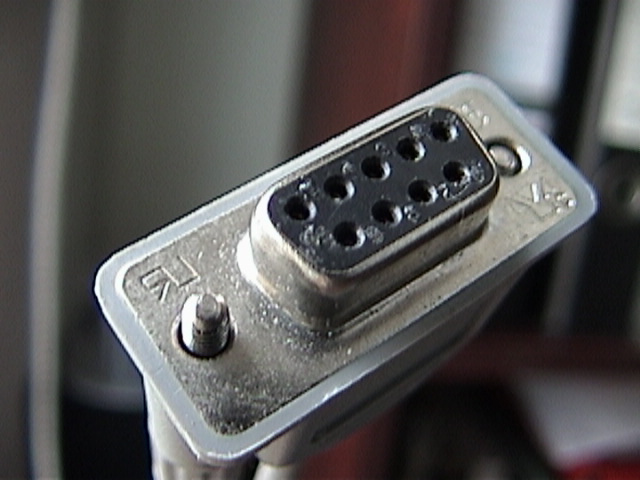
The RS232 protocol use the DB9 port on PC but we can't find this port a new PCs that's why we need a converter from the RS232 to USB we use (just like its function) a converter cable from RS232 to USB just like this one:

Some cables requires a driver to be installed so you need to find the right one.
Linking....
The best circuit that I personally tried it is this one and it works amazingly:
 

on Saturday, January 21, 2012
This tutorial is specially made for a member in my team Explorer who has the task to locate the position of our robot in a  map.
gmap.net is a great .net framework nonetheless it lacks of documentation.
So what I'm going to do is to show you how to refer gmap.net in your application  and how to locate something in the world map.
So let's get started!

First of all we need to download the binary package which contains all the *.dll that we need.
http://greatmaps.codeplex.com/releases/view/20235#DownloadId=67818
extract the folder in a decent place, say for exemple c:\\projects\
we will need only 2 files:
GMap.NET.Core.dll
GMap.NET.WindowsForms.dll
Now we will add the GMap.NET.WindowsForms.dll to our Visual Studio IDE toolbox.
to do so go to tools-->choose toolbox items

before clicking brows, make sure you selected the ".NET Framework Components"
Select the Gmap.NET.WindowsForms.dll
click Open or "ouvrir" the click ok
now go to your toolbox (view-->toolbox) you should find a new control the "GmapControl".


Next step  is even more simple :))
we need to add a reference to our new library in our projects so go to:
(view-->Solution explorer)
Select the GMap.NET.Core.dll click Ok
Note that the reference are being added to your projects reference,
we can now go back to the design and set our gmap control


Right click on the control and choose "propoerties"
In the properties windows set the Name to "mapexplr"

Finally we can start coding

Add these lines to the using lines
using GMap.NET.WindowsForms;
using GMap.NET;
using GMap.NET.MapProviders;


The Code
namespace WindowsFormsApplication2
{
    public partial class Form1 : Form
    {
        GMapOverlay overlayOne;
        String contry;
        public Form1()
        {
            InitializeComponent();
        }

        private void Form1_Load(object sender, EventArgs e)
        {

        }

        private void mapexplr_Load(object sender, EventArgs e)
        {
            //initialisation de notre map
            mapexplr.SetCurrentPositionByKeywords("Tunisia");
            mapexplr.MapProvider = GMapProviders.BingMap;
            mapexplr.MinZoom = 3;
            mapexplr.MaxZoom = 17;
            mapexplr.Zoom = 5;
            mapexplr.Manager.Mode = AccessMode.ServerAndCache;
            //ajout des overlay
            overlayOne = new GMapOverlay(mapexplr, "OverlayOne");
            //ajout de Markers
            overlayOne.Markers.Add(new                                         GMap.NET.WindowsForms.Markers.GMapMarkerGoogleGreen(new PointLatLng(36.657403,10.327148)));
            //ajout de overlay à la map
            mapexplr.Overlays.Add(overlayOne);
        }
    }
}
The final result:


Love you tunisia !
I hope this tutorial was helpful, till the next time don't stop sharing
on Thursday, December 29, 2011
Today I've got my new arduino board mega 2560 adk from the arduino distributor of Tunisia, and I'm extremely happy.
The board is perfect for me, it has 54 I/O(of which 14 provide PWM output), 16 analogue input and it's specially created as an open accessory device of an Android phone.
The most amazing thing about arduino that it's an open hardware So you can reproduce an android by yourself or even contribute to make a new arduino board.
another great thing about arduino that it has a huge community So  whatever is your problem believe me you'll find the solution.
Finally, In a word arduino is EASY.